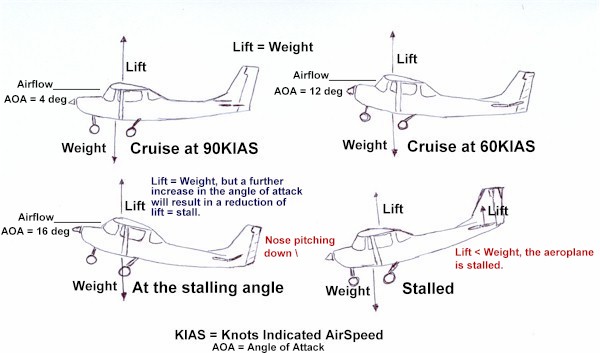
Since an aeroplane relies upon the flow of air around its wings to develop lift the reduction of airspeed for whatever reason can lead to a loss of sufficient lift to maintain height, (or altitude). The point at which lift reduces to less than equal to the weight of the aeroplane we call a Stall!
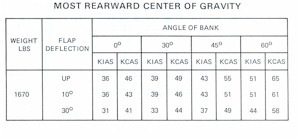
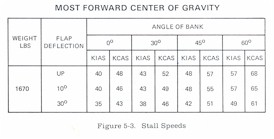
In the aeroplanes’ Flight Manual
or Pilots Operating Handbook there is a list of airspeeds
at which the stall can be expected to occur in level flight, and
at specified angles of bank.
In normal circumstances these speeds equate to the maximum angle
of attack at which the wing can develop enough lift to maintain
level flight.
The stall is always a function of the angle of attack and a straight wing will usually stall at an angle of around 16 – 17 degrees. Further increases in the angle of attack beyond the stalling angle will result in a further reduction of lift.
It is important to realise that the nose attitude of the aeroplane can only give you an indication of the angle of attack in level flight. It is possible to stall the wing even with the nose below the horizon.
Your instructor will have briefed you on looking out for other aircraft while flying around, this is especially important now that we’re going to stall! First we’ll do the required pre stall checks and these are Height, you must be recovered from the stall by 2,000 feet, Airframe, make sure the aeroplane is correctly configured and that the manoeuvre is approved, it is!, Security, do up your straps, make sure there are no loose articles, Engine, ensure this is healthy!, Location, there are some places you shouldn’t be doing this, and its good to have a field in mind if we lose the engine!, Lookout, make sure we’re not going to conflict with any other aircraft. We call these checks HASELL, it’s easier to remember them.
An alternative check is HALT; Height, Airplane, Location, and Traffic.
We reduce the power, apply Carburettor Heat to prevent icing, and raise the nose gently to maintain our height. As we approach the stall the Stall Warning Horn will sound, then there’s a little buffet, and then the nose drops gently, this is the stall.
To recover we need to reduce the angle of attack to that which will again produce lift by moving the control column forward to pitch the nose down. This will cause a loss of height so we apply full power to minimise this loss. Of course we control the consequent yaw by applying rudder.
Some airliner crashes in recent years have
shown how important the early learning of stall detection and
recovery can prevent a future catastrophe.
In Canada your first lesson in stalling is power off entry and
power off recovery:
The power is reduced to idle, the nose is
smoothly raised as the speed reduces, buffet is detected, and
finally the nose will drop, the nose is then lowered but moving
the yoke forward and the aeroplane is unstalled.
I like to set up the power off glide and note the attitude of the
aeroplane relative to the horizon; if after stalling you lower
the nose to just below this attitude you will regain flying speed
with the least amount of height loss.
This method of flying instruction instils the habit of lowering
the nose for stall recovery so that regardless of whether you
have power available or not, you automatically do the right
thing, and you may save the day in the future.
The stall without flaps and/or power is a very gentle affair, in the next lesson we’ll look at other situations in which the aeroplane may be stalled.
© Michael Peare 2015